Pages

Showing posts with label buttons. Show all posts

Show and Tell

Here are a few of my faves from the neighborhood.
Hope you have time for a cuppa and a little show and tell.
Big stitches, beads, feature buttons, applique, and some stitchery.
It all comes together in Lynette's tiny pictorial.
Here is Barbara's tiny quilt - sew cute!!!
Diane worries about the scale of the cats:flowers & birds
 Here is one of Diane's gourds.
The beaded edging is pine needles!
This one is HUGE, I never saw such a giant gourd.
The edging/handle is burned lasso.
 Everyone contributes Rows for Valor.
Then Carolee builds the Valor quilts.
The GFG on the wall really is from Carolee's grandmother.
 I love this one-patch, Super clever design.
Especially the border.
Not to mention, Karen's great workmanship.
I guess this also counts as R/W/B, and as pinwheel?
Foundation pieced pillow case. Also a one patch.
Spinning the biggy/smalls makes it look like a Spool.
Sculptured T-Shirt Quilt.
LOL I should have got a picture of the whole thing. Of course this block was center top ;)
This one is from the museum, and traveling AQSG exhibit.
There were more pictures but my phone ate them. AARG!
Check out the sculptured edge!!!
I would have flipped the sawtooth rows so they appear to come from the sashing instead of from the block....but that might have made the green too overpowering? What do you think?
For sure that is the tiniest dresdens I have ever seen. Paper Pieced?
Pearl says I should get to work now.
Happy Monday!

Button Pictures

This amuses me more than I can describe.
I love fences, and I love pumpkins (no idea why),
and I have saved these buttons for ages.

Finally made a project with them-
and it is even finished in time for Autumn:)
 
 
The small jute bag was $3.99 @JoAnn's.
I used a blunt cross-stitch needle for stitching.
The tree is felt, and put on with a brown floss running stitch.
The same floss is used for outline stitching the horizon line.
Orange and white thread tacked on the buttons.
Then I backed the inside of the bag with Washi Tape, (so my stitches won't catch on anything inside my new tote.)
 
Designing Details:
Begin with the larger elements in the picture, then placement of the smaller bits will be simple.
Plan to include a horizon line, otherwise your art will be floating in space.
Dark colors recede, and seem farther away, creating depth of field in your picture.
Remember to included negative space too- don't feel like you have to fill up every open area.
 
Shank buttons provide an opportunity for layering.
Your beautiful buttons will each stand out, and your picture will have more interest, if you work to alternate:
dark/light
large/small
pearly/matte
translucent/opaque
 
 
RHQ Etsy:  There are 35 buttons in this collage. We added themed sets of 35 buttons to our Etsy Studio shop, in case you'd like to make one too.  Assorted sets include orange, pink and pastel (in case you'd prefer a springtime tree.) More buttons are available in our Vintage Treasures section. Enjoy!


Scrappy Summertime Shoes

Now I know why I keep that big basket of strips; perfect stash for
 Rag Garland flip-flops upcycle, plus an ideal birthday present for our 9 year old neighbor, Kala.

The unique feature in our flip-flop creation are these butterfly button/charms by Jennifer Heymen (from the bead section in Micahels). Here's how easy it all was:
shoes + charms + strips (3/4" thru 1-1/2" wide) = FUN!


  1. Loop strips around flip-flop straps (just like a rag garland), then tie in a not for added wearability. Easiest to work from center outward.
  2. Trim ends of strips to 2" long or less (so you can't trip on them).
  3. Hand-tack charm at center.
  4. Ta-Done! Go outside and enjoy:)

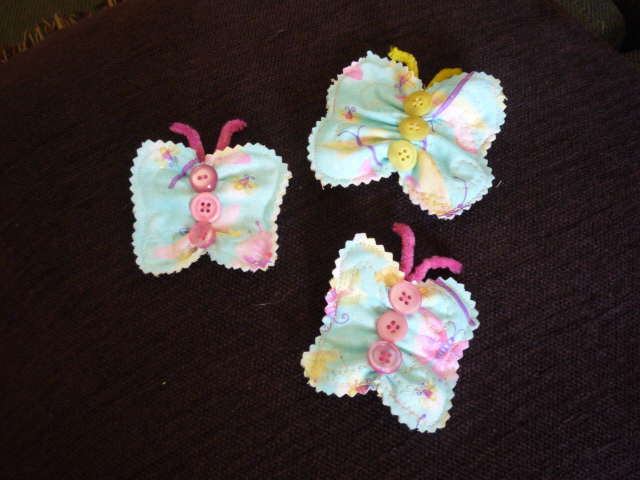
The Mini Butterflies Swarms

The Mini Butterflies!

These are the mini versions of the Butterfly Bunting. Instead of for decoreation for a spring time feel in the house, they're decoreations for your hair!

This butterfly is able to clip to any hair and go with every dress.

Butterfly Bunting

Bunting and garlands are my favorite way to decorate. Here is a quick quilty springtime project, good for fat quarter or scraps. Finish with ribbon ties, vintage buttons and pipe cleaner.
http://roadhomequilting.etsy.com
Make a toast shaped pattern, 5"h x 6"w. [I like brown grocery bags for pattern paper.]

Make a quilt sandwich, where both sides are "top" worthy fabrics. Butterflies are reversible. Stitch on pattern outline. [I used spray basting and regular stitching foot.] Cut out with pinking shears.
Quilt toasts. [I made swirly shapes with darning foot and mismatched bobbin thread.]

Hand basted and gather center of toast shapes.
Now you have a butterfly :)
Use 1/2 stick of pipe cleaner folded in a V shape. Tack on back of butterfly.
Finish Butterfly front with 3 large [more than 1"] buttons.
TIP:  For perfect spacing, sew on the center button first.
Tack Butterflies together at top edges. Tack ribbon ties to end butterflies.
  • ALTERNATE ENDING:  Extra Butterflies? Attach a clothes pin to back of butterfly with hot glue gun.
Happy Springtime & Happy Quilting