Pages

Showing posts with label extra holidays. Show all posts

Donna's Quilty Valentine

A new Pearl's Post poem was planned for today. But I'm' postponing it in favor of a new story related to  Quilting Nurses, one that is perfectly suited for celebrating this Valentine's Day.

Dad was again in the hospital this week, just for testing, and he is doing great. It was a new hospital, very nice yet unfamiliar to us. Imagine how happy I was to see this:

There were six giant framed batik blocks decorating the hospital main corridor! A tag on each frame said,
"Created by Donna Smith in loving memory of Donald Smith"
What a lovely tribute! See why I wanted this news for a Valentine's Day post? 
Do you think Donna is a local quilter? I hope I get to meet her some day.
Then I can tell her, thanks Donna, for the extra effort in framing your blocks, and making our hospital stay more beautiful and homey and bringing peace to my heart.
Happy Valentine's Day


Palo Verde Easter I

Palo Verde always blooms for Easter. I love when the whole town is covered in drifts of yellow blossoms like snow.

Palo Verde Easter

Every year it looks like Palo Verde will forget Easter. But somehow, it never does.
One of my favorite times of year, I wish I could put it in a jar and keep it.


Alex drew the jar for me :)
And so I did :)
I've been thinking of a Palo Verde quilt for a long time. This is not it LOL:)
So I call it PV1, hoping I'll get to the original plan......next Easter?


Except.....

I love the threads I found to match and create every element here.
I love the pieces and fabrics.
Finally got the tension right on the quilting with my old Brother!
....but together they're not working as hoped.


 What's missing????
 

Hexagon Box and holiday thoughts

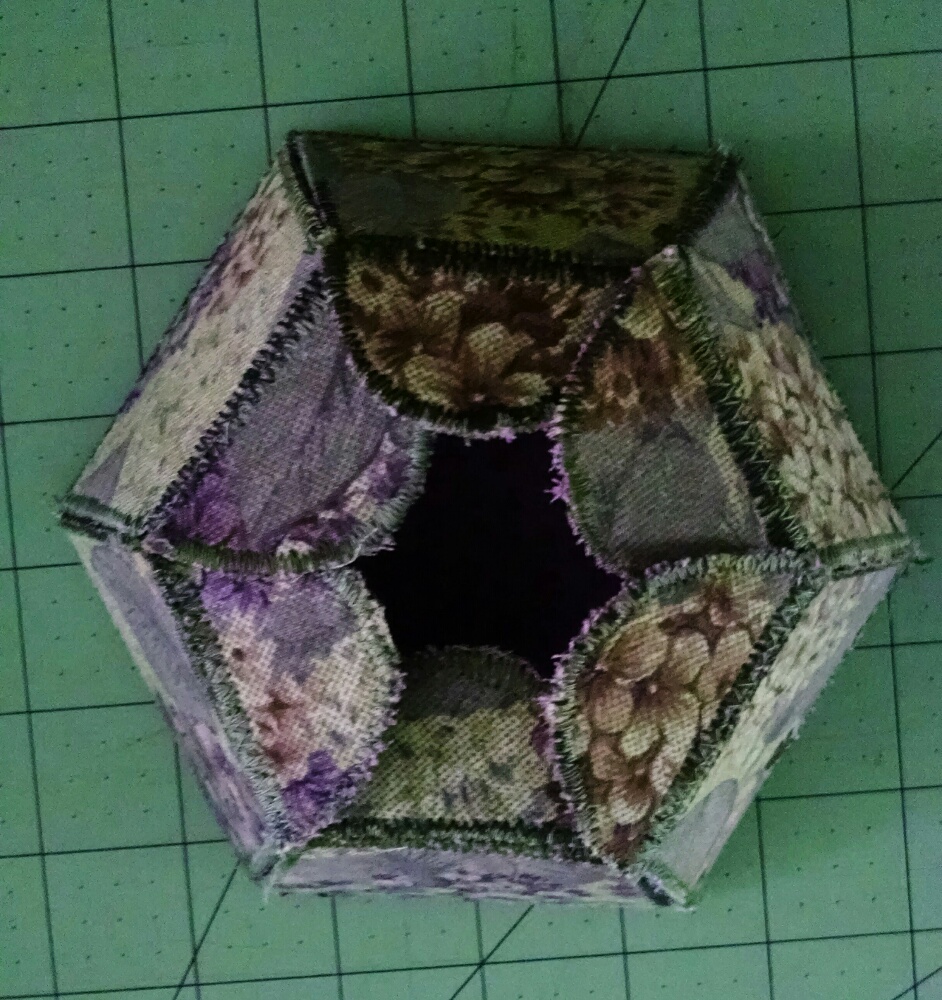
Made this hexagon box for my niece’s birthday:

Usualy I create something with poinsettias for her December birthday. But Baby Megan recently painted her room, so this time I made something to mat

This is Geta’s Flower  Box Free pattern.
I love working in mouldable interfacings, now that we’ve tried a few projects. However, I think the stuffs I had on hand were too heavy for Geta’s box. I couldn't get the last step of stitching sides to work, so I just tacked them up at the Petal joints. Actually works fine, and was super fast finish!

Wish I could make one for everyone of you who were so nice to chat with me in the hospital. It's been a month since then, but I don't want the year to end without saying how much you helped. Seems you guys that live in my phone are always awake, no matter when I need a talk:) Much appreciated! Hoping we all have a healthy New Year.
Me and Alex- she is not taller than me;)
I am sew looking forward to #BDSI
Boxing Day Sew In is my favorite SI of the year.
Maybe it's because we don't have Boxing Day here in the States, and I want in- it's such a unique holiday.
Maybe it's because it’s an extra long Sew Day, with the two holidays coming back-to-back.
Or maybe it's because it is the last holiday of the year. (You count New Year’s Eve as first holiday of next year, don't you?)
But mostly, I think it's my favorite Sew In because it is truly free time:
  • all the chores were finished for Santa’s visit
  • there are plenty of leftovers
  • everyone is occupied with their new toys
  • the holiday gifting projects are over (wheh!)
  • calendar has reset on the UFOs
See, whatever you do for BDSI is just because you want to! Guilt free of any “should bees” doing something else. Enjoy!

October Auction Small Quilts

It was a dark and stormy night...

Really!  Didn't think I would get to attend small quilt auction at guild last night. I travel 30 miles to guild meets. Not fun with flash floods warnings all day.
But the storm cleared around sunset, and Alex helped making diner and medications for her Grandpa, and I hadn't been to a quilt show in a long time so....off I go.

And glad I did! I got to share 2 witch hats in auction, which were well received, thanks ladies:)
Here are my faves from the mini quilt show auction:

Swoon Houses! Look- the doorways are fussy cut with tiny women. Sew Clever! LUV when a classic pattern gets a unique twist. Totally worth the trip!

Halloween Cat and Moon: Just adorable applique. I never think of batik for moon and starts. Darlene's quilts always make me smile.

Applique Bouquet:  LUV a scrappy background. This one is extra clever;

"tablecloth" portion of background is quilted with crosshatches, to differentiate from rest of background. Can you see?

Witch Sue:  Most Sues are applique, but this one is very cleverly foundation pieced. Sparkly star stickers added on her hat. Cute!

Quiltigami:  Origami kimono, first I've seen in real life! This works extra nice as a single block study, don't you think?

Simple & Sweet:  I never find cute fabric like this! Extra simple runner -oval framed with bias binding before cool border fabric- showcases fun fabrics. sorry only partial pic.

....And the storm stayed away until I returned to my own neighborhood:)
It's been a busy month with emergency plumbing and car repairs. Focus between surprises has been to try and  finishing witch hats for the RHQ Etsy Shop, so I haven't stopped to put up Holiday decorations yet. Mini quilt show was just what I needed to get in the holiday spirit.

Do you have Halloween quilts to share? I'd love to see them!!!  You are welcome to post onon
 Commemorative Quilting FB Page.

Home on the Range


Alex Golf Coach/School Librarian has been so wonderful - to our whole family.

 So I especially wanted to do something extra to remember her this Teacher Appreciation Week.

Where I come from, that means something homemade. Found a yard of cowgirl fabric in a vintage shop, and as I was musing about "Home on the Range..."
I decided QUILT MY GOLF CLUBS was a good idea.
You know, create something quilty,
like those ridiculous stuffed animal head golf club covers you've seen?

 It started out well enough.
Alex did some stitchery, of course:)
Decided homespun was the best choice for lining.
  

I quilted the cowgirl fabric.
1/8" zig-zag edge to make sure all layers got covered in seams.

All done! Early!! But it doesn't fit. Fun, but not functional. So...

Recut, refit, redesigned.....I lost track of how many times.
Only one "D" shaped seam, you wouldn't have thunk it so complicated.

Velcro Dot closure.
Far from the corset stay ties I had originally planned.


This adorable crochet edged bias binding is from Etsy,


Done. Wrapped at 5:00AM.
Will leave it to Coach to tell us if it is functional or fail:)


Remember this? Rainbow on the Ninth Hole.
Thanks my Twitter friends who always stayed with me
while driving the golf cart at Alex's matches.
Was fun chatting with you!

Strong Stitches

Alex stitched this for Grandpa's birthday.


Did I ever tell you, our Grandpa is a real weightlifter? Yes, since he was 14 years old.
Here are some of his early trophies from the 1950s:

This week is Dad's 74th birthday = 60 years of weightlifting!

Dad hurt his back earlier this year, and now he has a walker.
So I made Ale's stitchery into a patch pocket for a walker tote.
Just what every weightlifter needs:)
 

Flag Plate Mug Rug


A quick Summertime project, very easy Flag Plate Mug Rug is made from Dresden Plate Wedges with reverse applique center and bias tape binding. Can be created completely from scraps!

Add an optional verso applique as a guide for quilting interest.  Flag finishes 10.5" diameter.

4" Dresden wedges created with Easy Dresden Ruler, or you can cut wedges 4" long with 1" wide base and 2-1/4" top. Requires 22 total wedges. Cut 7 blue wedges, 7 red, and 8 white. You will also need a 6.5" scrap for center, a 12" scrap of batting and 12" square of backing fabric.
Optional: fussy cut a clever shape and apply ironon interfacing for verso applique.

Stitch blue pieces together along 4" sides. 1" base will be in the center, and wide top edge of edges will be on the outside of "plate" or wreath. Next, starting with white peace, alternate red and white pieces until flag is complete.  [In this example, red stripe fabric are the 7 "red" wedges, and 8 "white" wedge placements are a combination of solid red and white scraps.]
Press in one direction. From the back of your flag, press seam allowances clockwise or counterclockwise. Press center circle under 1/4". Tack center seam allowance in place with glue stick or basting glue.

Choose a scrap about 6.5" square for the center of plate. With right sides up, align plate Flag and center with basting spray or pins. Hold in front of a light or window to check alignment of center piece.

With 12" square scraps of batting and backing fabric, create "Quilt Sandwich":  Layer flag with center scrap over batting and backing.  Hold together with basting spray and/or pins.
Stitch around center circle. Stitch through all layers including the pressed under (glued) seam allowance. Seam allowance will be a scant 1/4" from edge of plate center.
Here is what first stitching looks like from back. Good job! You just finished a reverse applique circle :)
Optional: Add a decorative fusible applique to the backing fabric. Pick something that will create an interesting shape on the top of your quilt when you stitch around it. Next, start stitching in the ditch.  [Stitch on top of the wedge seams.] Be sure NOT to stich through applique shape.
Once you have finished all the stitching, trim the batting and backing to match Flag plate top.
Only one more step to finish! Bind Flag quilt with purchased 1/2" extra wide double fold bias tape. Follow package instructions. [This binding color is Stone Blue, a near denim blue that goes well with red and blue.]
 
Long may she wave!

Flag Day Quilting

Finally dove in the r/w/b stash. I only meant to finish this adorable Debbie Mumm panel.

Instead, I came out with 3 projects!
Decided the panel was so perfect alone that I only need add borders. Inner border has simple corner blocks with Debbie's starts (from panel surround) added in raw edge applique.
The outer border was really fun! I used my favorite Easy Dresden Ruler by Darlene Zimmerman to make 4" wedges for my round corner border; instructions here.

However, this time (because the 4" pieces were smaller and because I wanted lots of blue against the red corner blocks) I used 5 wedges on each corner point and gathered them to fit:

Well, I had so many wedges left over, I was able to make 4 Dresden Plate Flags.
Dresden Plate Flag by Road Home Quilting
So how should I finish these? 11" diameter Dresden plates. Please give me your ideas!

Lastly I salvaged a silk screened flag remnant someone had donated to my stash. But two of the red stripes had been cut off, so I wasn't sure what to do with the poor old thing. Finally decided it could work as two Flag Day Banners.
Finished with simple rolled seam. There are grommets at the top corners for hanging, and Velcro pockets on the bottom - to fill with trinkets (washers, rocks, anything heavy) so Banners will hang straight and not fly around. Will it work? I'll let you know on Flag Day tomorrow :)
This should have been the simplest of my 3 Flag Day projects but, you guessed it, turned out to be tricky splitting the stars. Have you noticed the way stars are tilted on our Flag? Well, thankfully there is enough blue between stars to get full seam allowances for both sides. But one side has single star points, and the other side finishes in double points! And hardest of all to figure out, the stripes only aligned well with the single point side. Here you can see on the double point side how I fudged the red line by growing the seam finish width:
I actually have a reason for ranting like this. The moral of this story is, please tell me, was 1/2 a day entirely too long to spend on a salvage project?
Pearl helps sort Dresden pieces