Pages

Showing posts with label crafts. Show all posts

Superior Quilts

historic Magma Hotel vintage bar
We made a field trip to Superior for an annual end of summer festival - Prickly Pear Days. 
We found some unique quilt art. But not all of them are actual quilts. See what I mean?

Apologies for the blur - I'm learning new phone/camera settings.
The black and white border is bugle beads in-the-ditch. And the binding is variegated crewel yarn whip-stitch. I like how the quote stitching crosses the background and first border.
There was a series of these mug-rugsized  arts, each with the hound's-tooth check background path. 
Did I mention my new camera issues? Sorry I can't show you the complete series.

These heart triptych fabric boxes are the same mug-rug artist, now with broderie-perse and stuffed hearts. I couldn't tell how they constructed the fabric boxes - sew clever!

This Town Hall quilt is painted blocks of local historic places.
I have to make special mention of the smokestack - it came down (video) 9 months ago. A landmark for 100-ish years, all gone. But commemorated in quilting and plenty more local arts :)
I just really liked this local artist painting of cow-girl with coyotes, so I wanted you to see it tool:0.
Thanks for sharing our trip!

Saguaro Ornaments and Bunting

Christmas lights are kindofa big deal here in the Wild West. I guess it's because...no snow! There's no excuse for not getting out there and doing the work of putting up lights. So we put lights on everything. Yes, even the cactus get lights and Santa Hats. I'll be sure to get you some good pics next month.

This bunting project was so quick. Stitched up in 2 hours! That included hunting for cookie cutters and tiny Christmas lights in the back of the closet. Easy beginner quilting project.
 
You know I love quilting with cookie cutters. This time I'm using Saguaro cookie cutter for a mini-bunting pattern. Sandwich some batting and fabric scraps in Christmas colors. Double batting will give more body to your tiny cookie cutter shapes and help support the lights.

Draw around your cookie cutter. This will be your stitching line. Next, stitch the outline with your darning foot. [Or go ahead and use a regular foot. Smaller stitches - about 3.5- will help you turn the tiny curves of cookie cutter shape.]

Then stich some straight lines right across your cactus shape. Change back to regular foot and use a long stitch. Overstitch your outline - that's right - we are coloring outside the lines! When you finish a line, just flip your cactus sandwich, turn around and stitch in the other direction, just like chain piecing, no need to trim threads.

Here is the time saving part: Get your pinking shears and cut out your cactus. See - all the threads are instantly trimmed. Now you have super Cactus Ornaments you can hang with regular ornament hangers or....

Tack Cacti onto jute for a quick and quilty Southwestern Holiday Bunting!
To determine how long your twine needs to be:  add 3" to the width of  each cactus, then add 20" for ties.


Lastly, remember to add Christmas lights to your bunting. [I was lucky to find battery powered mini light string in the back of the closet.] Here is Becka with lighted Saguaro Bunting at MQG Swap.

Quilt my Chairs

Pinterest convinced me I could do this. Time to refinish ye 'ol dinning room chairs.
Yes, this is my dining room chair. I know, yikes, right?
"Chair, meet Drill."
This soft sanding attachment was less than a $1 at the hardware store.
[Why aren't quilty tools always that cheap? Just sayin'.]
You could use sandpaper instead. But, hey, if you have a drill...
 
You'll also need:
screwdriver (ask your chair what kind)
mallet (optional)
old towel
old quilt :)
staple gun
3 spraypaints: primer, dark blue, black
 

Looks better already right? Here's how it goes:
  • take seat off chair w/ screwdriver.
  • sand chair (but don't sand cane back - I learned)
  • dust with old dishtowel
  • spray with primer
  • spray with blue spraypaint
  • spray with black spraypaint
It's VERY dry here, so I only waited 15 minutes between spray coats.
You may want to let them dry longer. 

  • Wrap quilt remnant right over old seat cover (pretend you're wrapping a present) and staple in place.

  • Fit chair onto seat. Mallet is handy for making alignments.
  • Screw chair to seat. [I found screws went right through old quilt, no need to pre-drill holes.]
 
Seat is covered with more of the old Northern Star remnant.
I takes two coats of spraypaint to cover primer. Blue undercoat gives a nice glow and keeps new black paint from being too stark with old quilt, don't you think?
 
But wait there's more -
I painted blue roses on top of chair back.
{Did I ever tell you how I learned to paint? Didn't think I would survive Alex's first day of kindergarten, so I invited all the Mom's on the street for a Donna Dewberry painting party to keep me busy until school was out. Hired a craft teacher for the party and we all learned to paint.}


Teddy Bears with Friends

When a new member is being welcomed to a family, it is customary that gifts are presented. Our friend Tracy is adopting this summer, and she asked Mom to help create a teddy bear matching the baby blanket Tracy quilted.


This is before the finishing touches of felt!
 
That blue heart on the pad of the paw was done by yours truly!
 
The face looks cute doesn't it? But which eye is better? This one...
 
... or these flowery ones?
 

Mom also got a chance to use the stuffing skill she learned from Mhairi. Plus, Mom liked this bear pattern; Simplicity 5461. She said it was challenging, but not too hard. I bet anyone could make a bear like this.


Scrappy Summertime Shoes

Now I know why I keep that big basket of strips; perfect stash for
 Rag Garland flip-flops upcycle, plus an ideal birthday present for our 9 year old neighbor, Kala.

The unique feature in our flip-flop creation are these butterfly button/charms by Jennifer Heymen (from the bead section in Micahels). Here's how easy it all was:
shoes + charms + strips (3/4" thru 1-1/2" wide) = FUN!


  1. Loop strips around flip-flop straps (just like a rag garland), then tie in a not for added wearability. Easiest to work from center outward.
  2. Trim ends of strips to 2" long or less (so you can't trip on them).
  3. Hand-tack charm at center.
  4. Ta-Done! Go outside and enjoy:)

T Creation for BVB

Saturday was one of the BEST days of my life! I went to my first rock concert. The 4 bands there put on the most spectacular performance! Even Mom was impressed, and she's been to a lot of concerts in her days. But I knew that it was going to be awesome. In my excitement for the show, I made my own band T-shirt for the Black Veil Brides, the main band at the performance.


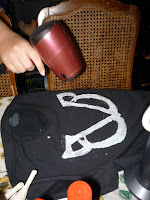
To make the T-shirt, I first used a white colored fabric pencil to trace out the logo of BVB on the shirt. Then I used white puffy paint to trace over the pencil marks. The next step Mom did was to paint inside the lines with her good Donna Dewberry craft paint. This was a beginners mistake.

We should have painted the inside of the pencil marks and then use puffy paint to outline the logo. There was less puffy paint on the logo then there had been when we started painting it. Either way it will still be an amazing craft if you want to try it.


This shirt needed some shine. So I decided that it would be the perfect idea to cover the BVB in sparkles! Before the paint would dry, I sprinkled sparkles over the BVB logo on the T-shirts. Needless to say, for the next few days, our whole house will be very sparkly.


After covering the shirt in sparkles, I blow dried the paint with a hairdryer on low so I could wear it sooner. The blow drying did wonders to the time it would have originally taken the paint to be dry as our desert soil.

Of course, what would a concert shirt be without a few rips and tears? I took one of Mom's good scissors (with permission!) and cut some wholes on our shirts and cut a sleeve off. I made the last few touches with rips at the bottom of the tee. Some of the wholes were too big, so Mom closed them with "Zombie" stitches in pink embroidery floss. Now this shirt is ready to be seen!


I was overjoyed to get to wear an original shirt I made to celebrate one of my favorite band's arrival. My bands and their music are special to me and I hope that Black Veil Brides knows this and that everyone of their fans feel the same way.

Pineapple Welcome

Welcoming Summer and friends new and old with a quilted pineapple door hanger. This easy project combines two applique pieces: pineapple and prim stitchery.

This pineapple applique is from Rag-Spun.  It comes in two parts: green top and yellow bottom. We used the medium 4"x5" sized Rag-Spun pineapple. You could use wool or felt shapes, a fussy cut pineapple, or an iron on patch. Even a card stock pineapple will work, if you plan on never washing door hanger.

I auditioned a lot of background fabrics for this project. This tropical blue wicker print gives a summery attitude to the project. All you need is a 10"x7" scrap.

Start with glue stick and tack pineapple pieces in place with the green part roughly in the center of background scrap.

Create a quilt sandwich (layer top over batting and backing). Secure layers with pins or basting stitches, or my favorite quilting tool, Spray Basting.

Quilt diamond grid all over. I used 3/4" grid to match the size of the wicker background print. Anything 1" or smaller will work. Just quilt right through the pineapple applique to secure it in place. No need to outline or edge-stitch. Recommend machine stitching and regular foot for quilting over Rag-Spun appliques.

Alex stitched "welcome" on muslin scraps. Replacing the "L" with cross stitches and stitching some of the letters in miss-matched floss gives a  primitive feel to the words.
Any idea how pineapples came to signify Welcome? I believe it started as a colonial era tradition. Guessing that's why primitive accents go so well with pineapples.
Alex used dark brown and gold floss. Center welcome stitches above pineapple and stitch around word in an oval shape. Trim muslin to follow stitching line, leaving a 1/4" margin.

Square-up edges. Finish with traditional quilt binding. One yard of binding will do. Attach a 10" or 12" scrap of ribbon for a hanger. Tuck ends of ribbon in top binding edge on back and tack in place.

The Mini Butterflies Swarms

The Mini Butterflies!

These are the mini versions of the Butterfly Bunting. Instead of for decoreation for a spring time feel in the house, they're decoreations for your hair!

This butterfly is able to clip to any hair and go with every dress.

Blue Valentine Bunting

This holiday bunting is so easy - no sewing or gluing, only two supplies:
  • felt ornaments
  • craft ribbon
By now you know my Valentine only loves blue. So when I found these blue felt hearts in the Christmas ornaments section, I had to get them.


Turns out there were 3 in the package, just enough for a sweet Valentines' Bunting.

Used the 1/4" blue craft ribbon to tie felt hearts together.


Added longer ties on the two open ends.  Wish all holiday decorating was this easy!


RHQ in LizzieBCre8tive

We, at RHQ, are so honored to be featured in the Holiday Issue of
  LizzieBCre8tive Dream, Laugh, Create, an amazing quilty emag.
If you look at pages 34-36 of this emag, you'll see our Quilted Santa Hat project.

Not only does Dream, Laugh Create, include our Santa Hats, but this issue by LizzieBCre8tive also has 9 awesome projects, plus a cookie recipe! (How convenient to have a cookie recipe for Santa. ;-) )

Thank you LizzieBCre8tive for choseing our Quilted Santa Hat to be in your emag!

Candy Corn Pillow in 3-D

This Road Home Quilting tutorial, Candy Corn Pillow, features
a unique 3-D effect, Cookie-Cutter Quilting Trick,
and a Treat for using-up extra tiny scraps.


Don't be afraid!

I, Kitty Pearl, will guide you  
each step of the way. 

To begin with, let's do some research.
Get some Candy Corn.


Candy Corn is triangle shaped, but longer in the center than on the base. Banded with white on top, orange in the middle, and yellow or brown on the bottom. So go ahead and use any color for the bottom band. The center orange stripe is the largest of the 3 color stripes. Yum!

 
Step 1:  Choose 3 fabrics; white, orange, and something else. We are using the adorable
 Boo! to You! by My Mind's Eye from Riley Blake Designs. You will need a fat quarter of each color. [2 fat quarters of each color will make 3 pillows]
Step 2:  Cut fat quarters in half to create 9" strips.
Join the strips into 3 very long bands with orange in the middle.
Step 4:  Press seams flat. Direction doesn't matter in this step.
Step 5:  Make a Candy Corn pattern. [Recycle Tip:  We  use grocery bags for pattern papers.]  Pattern is a triangle, 24" tall with 20" base. Use a cup or bowl to help you draw round corners. Center your pattern over your stripes. Mark both edges of the orange stripe on your pattern to create "register marks," that will help accurately reposition the pattern.

Step 6:  Start cutting out some Candy Corn! [Tip:  We like pan lids for pattern weights.] Flip your pattern upside down with each cut. Remember to use the register marks to re-align your pattern.

 Step 7:  Sort pieces. Some will have white on top, some will have white on bottom. Decide if pillows will have matching backs or reversed backs. Pair pillow pieces. [If making one pillow, you will have a reversed back] Notice that orange band now appears to be the largest stripe. Spooky!
Step 8: Press pillow pieces so that seams run opposite on each piece, and will easily nest together when pillow is assembled.
Step 9:  Layer pieces with batting. No backing necessary. We like spray basting, but any method will work here. Fusible craft batting is also suitable.
Step 10:  Quilt as desired! 
 Quilting Tool TRICK: Turn cookie-cutters into quilting stencils.
Ink holiday themed Cookie Cutters with a stamp pad. Use washable ink if you are stamping on quilt top. We stamped and quilted on the batting side.

Step 11:  After quilting, trim batting with bevel cut. Hold scissors parallel to top. Batting is angle cut to reduce bulk in seam allowance area. Press one last time.

Step 12: Secret 3-D Step Baste curved edges. Pull basting bobbin to gather edges. Easy!

Step 13:  With right sides together, match orange seams, stitch around pillow leaving a hole in side.
Step 14:  Turn pillow case right side out through hole. Remove basting stitches in corners.
Step 15:  Stuff pillow then close hole by hand with blind stitch.

Because pillow is lined with batting, it will be hard to stuff with batting. The battings will want to stick together. This is an opportunity to recycle that box of cuttings and "scraps too small to use." [Admit it, you know you have one too.] Go ahead and stuff your Candy Corn Pillow with scraps. Since pillow is lined with batting, the scraps won't feel lumpy. Sweet!

Optional: Having trouble matching the orange side seams? Hide uneven seams with giant ric-rac.

Congratulations! You created a yummy Candy Corn Pillow made with Tricks and Treats. Thanks for quilting with me, Kitty Pearl, and Happy Halloween from Road Home Quilting
"Hey, where did everybody go?"