Pages

Showing posts with label scraps. Show all posts

Vintage Remake

I found this flannel log cabin in a vintage shop some years ago. 
It is small, about 30" square. The red centers are only 1/2"!
I've always wished to try recreating this very clever design. 
Have you seen this block before? Does it have a name?

The leftover honeybun scraps from Bergamot cat quilt are ideal for this project!
And there are even enough scraps for two colorways; orange and white. 
This is Moda bakeshop, Last Bloom by Sandi Gervais, and I absolutely love it!
 I got this right before the lock down, it was just the 
IDEAL colors I had dreamed of for creating Bergamot
California poppy orange and depression jade. 
(Hence the name, Bergamot;)

 
Here are the orange log-cabin flower centers. So far so good. 
I will get back with you about the white/green blocks. Honeybun centers finish at 1" square, so my project will be twice as large as the original vintage inspiration.

Don't you just love it when a wish quilt comes together? 
In this case, one honeybun is making 3 dream quilts! 
(Bergamot, orange log-cabin, white log-cabin)

BTW:  Bergamot is with the photographer. 
As soon as I have a pattern cover pic, you will see it in the Etsy shop.

New Quilt Formats

Inspired by @AngieQuilts :)
Once upon a time...my first FB friend sent me this WOW! thread painted postcard!!
I had never seen anything like it! I believe Angie pioneered thread-painting in this new medium.

[No worries, you too can get one of Angie's amazing creations in Angie's Textile Art Etsy Shop]
 
While I still haven't quite got the hang of thread painting and fabric printing like Angie does,
I have been playing with the magic postcard interfacing
 
and..........
 
its perfect for quilted jewelry!
 
It took many tries to work out the finishing details over the years since I received Angie's lovely Sunflower Postcard all the way from Cheadle, UK,
but here at last is Hexagon Cuff
Thank you, Angela:)


City Scape

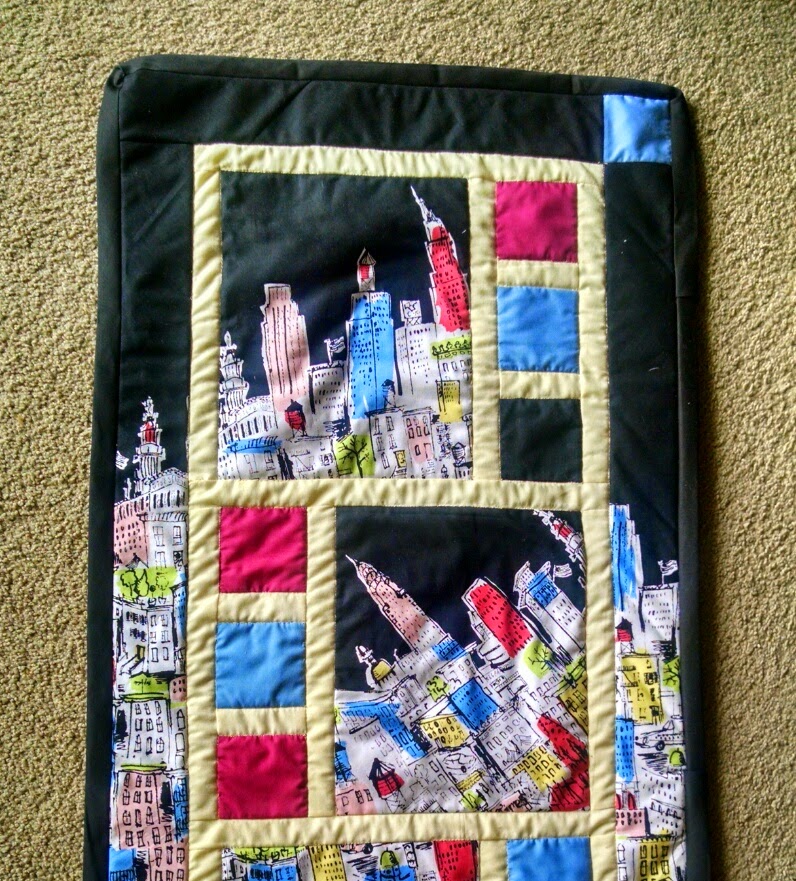
What can you do with a strange panel like this?
Likely only 1/2 panel at that....
See; it's a very cute city, in back to back arcs. Hmmm....
No selvedge, so I'm not sure what it's supposed to be.
Have you seen this one before?
I'm making Divided By 3 by Kari Nichols for a Springtime Runner Swap at club.
I'm worried this city nightscape is more of a summertime runner.
But I can't resist playing with this big print on these giant open blocks:)

I used my phone camera to audition border placements. Do you do that too?

Binding is too wide, so the border ended up thinner than the little setting squares.
[But ThankGoodness for 24 hr. WalMart when you just
have to have black binding in a hurry, know what I mean?]
Next time I work in big print, I'll remember to cut borders extra wide to finish at ideal size.
I added the pink and blue corner sets, just to break up the continuous curves of black and white.


This was fun! I'm going to look for more big prints and go again.

Waiting for Santa Bear

Christmas is coming and Santa is almost on his way. How will you ever stand the wait? Fortunately, Mom has made a buddy to ease the impatient.

He's already for Santa with his night cap and quilt.

You can take off his accessories to wash or be stored easily. 

Mom has many more different color schemes. This is a classic, though.

If you can't just have one bear http://roadhomequilting.blogspot.com/2014/09/three-bears-in-little-wood.html then you can buy another one at our Etsy store. There are 7 in stock.

Saguaro Ornaments and Bunting

Christmas lights are kindofa big deal here in the Wild West. I guess it's because...no snow! There's no excuse for not getting out there and doing the work of putting up lights. So we put lights on everything. Yes, even the cactus get lights and Santa Hats. I'll be sure to get you some good pics next month.

This bunting project was so quick. Stitched up in 2 hours! That included hunting for cookie cutters and tiny Christmas lights in the back of the closet. Easy beginner quilting project.
 
You know I love quilting with cookie cutters. This time I'm using Saguaro cookie cutter for a mini-bunting pattern. Sandwich some batting and fabric scraps in Christmas colors. Double batting will give more body to your tiny cookie cutter shapes and help support the lights.

Draw around your cookie cutter. This will be your stitching line. Next, stitch the outline with your darning foot. [Or go ahead and use a regular foot. Smaller stitches - about 3.5- will help you turn the tiny curves of cookie cutter shape.]

Then stich some straight lines right across your cactus shape. Change back to regular foot and use a long stitch. Overstitch your outline - that's right - we are coloring outside the lines! When you finish a line, just flip your cactus sandwich, turn around and stitch in the other direction, just like chain piecing, no need to trim threads.

Here is the time saving part: Get your pinking shears and cut out your cactus. See - all the threads are instantly trimmed. Now you have super Cactus Ornaments you can hang with regular ornament hangers or....

Tack Cacti onto jute for a quick and quilty Southwestern Holiday Bunting!
To determine how long your twine needs to be:  add 3" to the width of  each cactus, then add 20" for ties.


Lastly, remember to add Christmas lights to your bunting. [I was lucky to find battery powered mini light string in the back of the closet.] Here is Becka with lighted Saguaro Bunting at MQG Swap.

Flag Plate Mug Rug


A quick Summertime project, very easy Flag Plate Mug Rug is made from Dresden Plate Wedges with reverse applique center and bias tape binding. Can be created completely from scraps!

Add an optional verso applique as a guide for quilting interest.  Flag finishes 10.5" diameter.

4" Dresden wedges created with Easy Dresden Ruler, or you can cut wedges 4" long with 1" wide base and 2-1/4" top. Requires 22 total wedges. Cut 7 blue wedges, 7 red, and 8 white. You will also need a 6.5" scrap for center, a 12" scrap of batting and 12" square of backing fabric.
Optional: fussy cut a clever shape and apply ironon interfacing for verso applique.

Stitch blue pieces together along 4" sides. 1" base will be in the center, and wide top edge of edges will be on the outside of "plate" or wreath. Next, starting with white peace, alternate red and white pieces until flag is complete.  [In this example, red stripe fabric are the 7 "red" wedges, and 8 "white" wedge placements are a combination of solid red and white scraps.]
Press in one direction. From the back of your flag, press seam allowances clockwise or counterclockwise. Press center circle under 1/4". Tack center seam allowance in place with glue stick or basting glue.

Choose a scrap about 6.5" square for the center of plate. With right sides up, align plate Flag and center with basting spray or pins. Hold in front of a light or window to check alignment of center piece.

With 12" square scraps of batting and backing fabric, create "Quilt Sandwich":  Layer flag with center scrap over batting and backing.  Hold together with basting spray and/or pins.
Stitch around center circle. Stitch through all layers including the pressed under (glued) seam allowance. Seam allowance will be a scant 1/4" from edge of plate center.
Here is what first stitching looks like from back. Good job! You just finished a reverse applique circle :)
Optional: Add a decorative fusible applique to the backing fabric. Pick something that will create an interesting shape on the top of your quilt when you stitch around it. Next, start stitching in the ditch.  [Stitch on top of the wedge seams.] Be sure NOT to stich through applique shape.
Once you have finished all the stitching, trim the batting and backing to match Flag plate top.
Only one more step to finish! Bind Flag quilt with purchased 1/2" extra wide double fold bias tape. Follow package instructions. [This binding color is Stone Blue, a near denim blue that goes well with red and blue.]
 
Long may she wave!

Those Surprises

You know kids have that little fascination for bikes. They love it and treat their bike like family. They care for it, fix it, ride it, make the little bike happy. I am one of those kids. I love my Quilt Market Meet-Up bike with it's sky blue color, shimmering in the sun. It even has a basket to carry everything that I need in it. You wouldn't believe the look on my face when Mom had created the cutest creation for my bike. --Alex

up-cycle bike basket liner
 
I made Alex's basket liner from an old work shirt and bunting flags leftover from other (apron) projects. A double recycle project!
 
Shirt placket is the casing, with shirt front still attached for liner sides. Liner bottom was cut from one of the shirt sleeves. Sides (shirt front) were gathered around oval (sleeve) bottom. The big design challenges were:


  1. Deciding to put the exposed seams on the outside. They really are well hidden by the basket and the bunting.
  2. Giant snaps instead of drawstring casing.[ It is so hot here that sticky Velcro melts off in the garage, so although an obvious choice, that wasn't a real option.]
  3. Shirt pocket section was pieced in center front of basket liner. Gathering made the pocket gap, so skip that step on the front edge if you use a pocket.
 
Well, all that is left of Uncle Dennis' denim work shirt is the collar, cuffs, and one sleeve. Can you think of another upcycle project that would finish it off?
  Time to go outside for a summertime bike ride :)


Scrappy Summertime Shoes

Now I know why I keep that big basket of strips; perfect stash for
 Rag Garland flip-flops upcycle, plus an ideal birthday present for our 9 year old neighbor, Kala.

The unique feature in our flip-flop creation are these butterfly button/charms by Jennifer Heymen (from the bead section in Micahels). Here's how easy it all was:
shoes + charms + strips (3/4" thru 1-1/2" wide) = FUN!


  1. Loop strips around flip-flop straps (just like a rag garland), then tie in a not for added wearability. Easiest to work from center outward.
  2. Trim ends of strips to 2" long or less (so you can't trip on them).
  3. Hand-tack charm at center.
  4. Ta-Done! Go outside and enjoy:)

Pineapple Welcome

Welcoming Summer and friends new and old with a quilted pineapple door hanger. This easy project combines two applique pieces: pineapple and prim stitchery.

This pineapple applique is from Rag-Spun.  It comes in two parts: green top and yellow bottom. We used the medium 4"x5" sized Rag-Spun pineapple. You could use wool or felt shapes, a fussy cut pineapple, or an iron on patch. Even a card stock pineapple will work, if you plan on never washing door hanger.

I auditioned a lot of background fabrics for this project. This tropical blue wicker print gives a summery attitude to the project. All you need is a 10"x7" scrap.

Start with glue stick and tack pineapple pieces in place with the green part roughly in the center of background scrap.

Create a quilt sandwich (layer top over batting and backing). Secure layers with pins or basting stitches, or my favorite quilting tool, Spray Basting.

Quilt diamond grid all over. I used 3/4" grid to match the size of the wicker background print. Anything 1" or smaller will work. Just quilt right through the pineapple applique to secure it in place. No need to outline or edge-stitch. Recommend machine stitching and regular foot for quilting over Rag-Spun appliques.

Alex stitched "welcome" on muslin scraps. Replacing the "L" with cross stitches and stitching some of the letters in miss-matched floss gives a  primitive feel to the words.
Any idea how pineapples came to signify Welcome? I believe it started as a colonial era tradition. Guessing that's why primitive accents go so well with pineapples.
Alex used dark brown and gold floss. Center welcome stitches above pineapple and stitch around word in an oval shape. Trim muslin to follow stitching line, leaving a 1/4" margin.

Square-up edges. Finish with traditional quilt binding. One yard of binding will do. Attach a 10" or 12" scrap of ribbon for a hanger. Tuck ends of ribbon in top binding edge on back and tack in place.

The Mini Butterflies Swarms

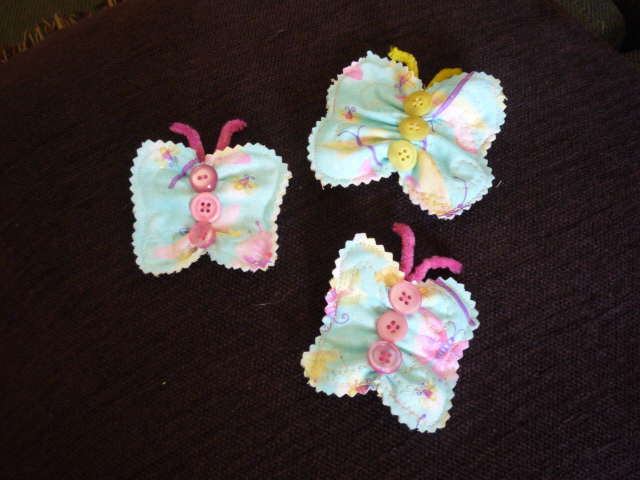
The Mini Butterflies!

These are the mini versions of the Butterfly Bunting. Instead of for decoreation for a spring time feel in the house, they're decoreations for your hair!

This butterfly is able to clip to any hair and go with every dress.