Pages

Showing posts with label quilter tools. Show all posts

Ruler Tricks

Hey, do you do this?

To keep a long ruler from turning on you when cutting,
put a smaller ruler behind it.


Still pattern writing here. Hoping our new  Dresden Steps will 
magically appear in RHQ Etsy shop tonight. Or maybe tomorrow...

Road Home Quilting
Dresden Steps

Trick Triangles


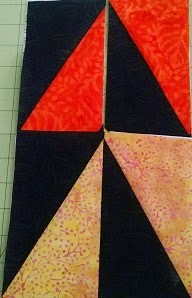
I've been playing with 60degree Triangles-On-a-Roll foundation piecing paper.....


....and then,  I cut each triangle in half......

and made "half-square" Rectangles :) :) :)

Here are some fun block ideas with my new HSRs. HTR?
What should we call these?
I'm liking this strange shape in batik and black.

Not sure which way to go with them yet.

I'll keep playing :) You too!

Quilt On!

Triangle Roll Trees


I used 36 degree Triangles on a Roll to piece a forest for my wintry quilt. 36 Triangles make ideal Christmas trees. Use the same Triangle Roll foundation paper to piece trunks for your trees. Here is what I mean: 

Use 36 degree Triangle on a Roll Ruler to cut green (tree) and blue (sky) 6" triangle. You need one more blue than green pieces. Follow Triangle on a Roll paper instructions or Tutorial to Sew & Fold tree tops.

Cut 2.5" strips of blue (sky) and enough 1.5" x 2.5" brown (trunks) to match the number of trees you have pieced.

Using the same Triangle on a Roll paper, working right to left, center one trunk at the point of a "sky" (upside down) triangle. I like glue stick to hold first piece in place.


  1. Right sides together, stitch blue/sky strip to left side of  brown/trunk piece. Fold blue piece open.
  2. Align next trunk piece over blue strip, right sides together, 1/4" from center of next down triangle point. Pin in place. Stitch on left side.
  3. Cut blue strip 1/4" from stitching line. Fold trunk piece open (right side up).  Return to step one.

When all trunks have been pieced, match tree paper roll to trunk paper roll. Right sides together, tops of rolls facing.
Mark center of first tree and first trunk to align rolls.


Follow stitching line on roll, stitching 1" from edge of paper for perfectly matched forest.

Half Square Triangle Stencil

Does a stencil count as a quilting tool? I'm saying yes because this stencil helps make perfect HST patches. [Half Square Triangles]

I found this stencil pack online at Connecting Threads. Stencils by Sunday Best Quiltworks, and they have a how-to video on making stencil HSTs. Stencil sets for making HST in 8 sizes.
My set of 4 stencils from Connecting Threads makes HST 1" thru 2-1/2".

pounce, sew, cut. Easy!

And addicting - seriously I could do this all day :D

I'm making 1" patches for Lover's Lane queen quilt because that is the stencil size that fits on the 1/4 yd. blue and white sampler pack cuts I have. Yes, I'm crazy. --Mom
"1" patches, are you crazy?"

Candy Corn Pillow in 3-D

This Road Home Quilting tutorial, Candy Corn Pillow, features
a unique 3-D effect, Cookie-Cutter Quilting Trick,
and a Treat for using-up extra tiny scraps.


Don't be afraid!

I, Kitty Pearl, will guide you  
each step of the way. 

To begin with, let's do some research.
Get some Candy Corn.


Candy Corn is triangle shaped, but longer in the center than on the base. Banded with white on top, orange in the middle, and yellow or brown on the bottom. So go ahead and use any color for the bottom band. The center orange stripe is the largest of the 3 color stripes. Yum!

 
Step 1:  Choose 3 fabrics; white, orange, and something else. We are using the adorable
 Boo! to You! by My Mind's Eye from Riley Blake Designs. You will need a fat quarter of each color. [2 fat quarters of each color will make 3 pillows]
Step 2:  Cut fat quarters in half to create 9" strips.
Join the strips into 3 very long bands with orange in the middle.
Step 4:  Press seams flat. Direction doesn't matter in this step.
Step 5:  Make a Candy Corn pattern. [Recycle Tip:  We  use grocery bags for pattern papers.]  Pattern is a triangle, 24" tall with 20" base. Use a cup or bowl to help you draw round corners. Center your pattern over your stripes. Mark both edges of the orange stripe on your pattern to create "register marks," that will help accurately reposition the pattern.

Step 6:  Start cutting out some Candy Corn! [Tip:  We like pan lids for pattern weights.] Flip your pattern upside down with each cut. Remember to use the register marks to re-align your pattern.

 Step 7:  Sort pieces. Some will have white on top, some will have white on bottom. Decide if pillows will have matching backs or reversed backs. Pair pillow pieces. [If making one pillow, you will have a reversed back] Notice that orange band now appears to be the largest stripe. Spooky!
Step 8: Press pillow pieces so that seams run opposite on each piece, and will easily nest together when pillow is assembled.
Step 9:  Layer pieces with batting. No backing necessary. We like spray basting, but any method will work here. Fusible craft batting is also suitable.
Step 10:  Quilt as desired! 
 Quilting Tool TRICK: Turn cookie-cutters into quilting stencils.
Ink holiday themed Cookie Cutters with a stamp pad. Use washable ink if you are stamping on quilt top. We stamped and quilted on the batting side.

Step 11:  After quilting, trim batting with bevel cut. Hold scissors parallel to top. Batting is angle cut to reduce bulk in seam allowance area. Press one last time.

Step 12: Secret 3-D Step Baste curved edges. Pull basting bobbin to gather edges. Easy!

Step 13:  With right sides together, match orange seams, stitch around pillow leaving a hole in side.
Step 14:  Turn pillow case right side out through hole. Remove basting stitches in corners.
Step 15:  Stuff pillow then close hole by hand with blind stitch.

Because pillow is lined with batting, it will be hard to stuff with batting. The battings will want to stick together. This is an opportunity to recycle that box of cuttings and "scraps too small to use." [Admit it, you know you have one too.] Go ahead and stuff your Candy Corn Pillow with scraps. Since pillow is lined with batting, the scraps won't feel lumpy. Sweet!

Optional: Having trouble matching the orange side seams? Hide uneven seams with giant ric-rac.

Congratulations! You created a yummy Candy Corn Pillow made with Tricks and Treats. Thanks for quilting with me, Kitty Pearl, and Happy Halloween from Road Home Quilting
"Hey, where did everybody go?"

Making the Gardener's Picking Apron

If you click this link you could get the book that shows you how to make these aprons too. Thank you Bramcost Publications for sharing this book!
Remember how you voted on which vintage apron to make from our book review How to Make Aprons? Well, Mom did it! She combined the Pickers Apron (pg. 69) and the Gardening Apron (pg. 84) to make the ultimate one-of-a-kind Gardener's Picking Apron.

Blogger is doing the sideways picture thing again - WHY?!?!
Mom made the apron with with recycled fabric from this denim work shirt.
 Mom uses plates and duct tape for her drafting tools.


Sewing Tip of the Day:  

if you don't know witch is the right side, put a piece of tape on the right side to mark it.

These are the cool buttons for balancing the strings you pull to make a pocket. They are made from pottery and have Celtic Knots on them.

This is how the apron is used. Gather the string to make a basket. Add your own belt.


Plus, Apron also has 2 hanging loops for gardening tools.

You can get this super Gardening Apron for yourself in our Etsy Shop:  http://roadhomequilting.etsy.com
UPDATE:  Garden Picker's Apron sold in about 20 hours, Thank You! We will make more as denim shirts become available, so please keep watching RHQ Etsy.


Corvid Applique

Alex has gone camping with the Girl Scouts. Pearl and I sure miss her. It is too quiet here.
In the meantime, I have learned something new. Darlene taught me wool applique!

I have resisted learning wool because:
  • I don't need more UFOs
  • Not a huge applique fan
But Darlene's Blackbirds quilt so inspired me, I had to try it. And guess what, I was so wrong!
Turns out, the mystery of wool applique is the good old fashioned whip stitch. Same as in my favorite, English Paper Piecing. So the only trick is all in the cutting; getting the shape right to start with. Darlene says small sharp scissors are a must. (the excuse I needed to buy new scissors :)
And you know those scalloped dents on the edges of wool applique? Guess what, that's okay!
I had so much fun with my blackbirds from Darlene, I have already finished them. So no more UFOs! All I need to do is pick the right fabric for setting strips. Want to help? Which one do you like best?

Chocolate Butterflies

Sunflowers

Postagestamp Cheater print


Do bobbin washers work? Part 2

Success and sanity restored!
Yes, I found the $10 investment in Little Genie Magic Bobbin Washers to be worthwhile.
They work :)

Do "Bobbin Genies" really work?

Yikes! I've tried new needle, new thread, hunting for hidden lint bunnies...nothing is helping my "automatic" thread tension.
Do these Magic Bobbin Washers really work? I used my We'd Rather Be Quilting guide to call around until I found a shop that carried them. You are supposed to put them under your bobbin to end tangles. I will let you know in my next post if these tiny Teflon circles have saved my sanity.
Don't worry, I will post again today.